Showing posts with label backyard. Show all posts

Thursday, December 8, 2011

Incredibly Edible Elk Roast... Caffeinated!


Let me start off by saying that I have never liked roast. I've eaten it because that was what we had for dinner and "if you don't eat it you're not getting anything else!" It was always dry no matter who made it and I can recall even now the chewing and chewing, working a piece like it was cud... working a piece until I could hang my NKOTB poster on the wall with small wads of it *shudder*

Not anymore, my friends!

My husband and I both got our elk this year (means LOTS of burger) so I had him make roasts. I went in search of roast recipes and found a couple I liked, making this particular one out of ideas from those.
I made it with the expectation that it would be a little dry. To me, roast = dry. Its just a given. Oh my jeebers, I bet the look on my face was priceless when I had my first bite!

I felt like Indiana Jones when he found the lost treasure.


I felt like a school kid waking up to snow and no school!


I felt COMPLETELY REBORN!!!


I'm kidding.. but it IS spectacular and I love that I have a way to make it that I will enjoy eating.


My first elk. Got it on our honeymoon Nov. 2011


Incredibly Edible Elk Roast
     1 Elk Roast (or beef) -ours were about 4lbs
     1 can Beefy Mushroom soup
     26-32oz Beef Broth
     1 freshly brewed cup of coffee (or 2, I like 2 cups)


Elk has MUCH less fat than beef. Less additives too ;}
 
Now grease your crock!

    Sear the meat on all sides, don't forget the ends. A pair of tongs is great for this because it won't pierce the meat. Try not to pierce any meat you cook because this will allow the juices to escape.

    Super Tip: if you must pierce the meat (taking temp, etc), before you pierce it, have a pinch of flour in one hand. Pierce the meat & when you're done, fill the hole with the pinch of flour as soon as possible so that it seals back up. Trust me.

    Place the meat in the greased crock, try to keep the meat away from the sides so that it doesn't burn.


    Pour the can of beefy mushroom soup over the roast.
    Pour the beef broth over the roast.
    Pour the coffee over the roast.


   Your roast may or may not be completely covered at this point. If it is not, we will make an exception to the "Never Take The Lid Off While You're Cooking In The Crock" rule and halfway the through the cooking time (or whenever you get back home) you can take the lid off, flip the roast over and put the lid back on. Make sure no one is looking while you violate The Laws of the Crock.

    Once you've got the roast and liquids in, you've got two choices. You can marinate it overnight, or set it to cook. I like things like this that can sit overnight because I prefer to make things later at night rather than in the morning. Either way, this will be delicious!

    Cook on LOW 7 to 8 hours  - if it's 3-4" thick, 7 hours on the dot!

  *note: when done, remove liquids and add cornstarch to them for a nice deep, dark flavored gravy.

Tuesday, December 6, 2011

By Crockies, Egg Nog Cake!

I'm sure you're reading this because you love egg nog as much as I do (maybe more) but just in case you're a nog hater reading this who is completely unable to look away due to some sort of instant and freaky temporary paralysis, dear god, YELL for someone to click the mouse because you will not want to stay tuned for all of the noggity egg noggy horror about to befall a hapless vanilla cake mix.

Or, stare -->HERE<-- until your screen saver kicks in.

I adore egg nog but can only handle a small glass or two a night because it is just SO rich. If I could have the flavor, though..

Another fellow crocker and friend of mine suggested I find a recipe including egg nog for crock pottery (I'm still trying not to use the word CP) and I found this simple one. I think anyone (of any age or skill level) with a crock and none of the ingredients could buy & build this in 10 minutes for less than $10. I think I'm going to let Aly make it tomorrow!

  Egg Nog Crock Cake

   Grease your crock and flour it! No one wants to see a naked crock.

    Although it would save the washing of another bowl, I would suggest NOT mixing this in the greased crock, it will scrape grease off of the crock in some much needed areas.

    Mix together :

     1 Package Vanilla Cake Mix
     1 C Egg Nog
**1 t Rum Flavoring
     1/4 tsp Nutmeg

    Pour into crock, cook on LOW 4hrs

**Everywhere I looked, this just said "t". Not "teaspoon", "tsp", "tablespoon", or "tbs". I have interpreted this as follows:

    If you are sad, this is one Tablespoon of Rum.
    If you are happy, this is one Tablespoon of Rum.
    If you are reading this, it is one Tablespoon of Rum.
    Unless you will feed it to your children, then its 4 Tablespoons of Rum, they'll go to sleep early, you can eat the rest and partaaayyy!

    Holy cats, I'm kidding! Don't waste your good Rum on the kids, use 1 teaspoon of Rum flavoring instead!

**UPDATE** 12/07/11 8:54pm : The "cake" has been in the crock on low for 4 hours. It looks like my crock had digestive issues. It's texture is between that of a custard and a sponge. The flavor is wonderful but I'm not quite sure what to do with the stuff. Maybe put it over ice cream? Blend it with some whipped cream and put a dollop into my coffee or hot chocolate? I made it in Hamilton, thinking i'd like more surface area on top rather than side. I might just get another cake mix tomorrow and try it in Hamilton, Jr.

PLEASE LET ME KNOW WHAT YOU DID WITH YOURS AND HOW IT TURNED OUT  

Monday, December 5, 2011

Apple Chrisp


Its not crisp. Its in a crock for crying out loud! Not much is going to be crisp out of a crock. Well, THIS batch I did in a crock. (I hesitate to use the words "crock" and "pot" together after what happened to the chefs formerly known as the "Crock Pot Girls". They were told by the owners of the trademark "Crock Pot" to cease and desist using that name. Jerks. I said it.)

Anyway... the "crisp" part is not crisp in a crock so... Apple Chrisp it is. The 'h' makes it softer.
It is 20 days until Christmas, my favorite holiday, and I'm not feeling it at all. I am bummy. I don't have my tree up yet. Nuthin.

*sigh*

I am going to post this and then eat a bowl of it!

This recipe was introduced to me via Crock Pot Girls (ooooo illicit) and I believe it was submitted to them by a lady named Melissa. I don't want to take any credit away from those deserving; this is just my favorite recipe for Apple Crisp and it is the only one I will ever use.
As always, an O is an indication of an optional ingredient or step that I have not done but you may want to. I used my 4qt crock and multiplied the recipe by 1.5 (9 apples instead of 6, etc) to completely fill it.

  Apple Chrisp Topping
     1 C Flour
     1/2 C Brown or Light Brown Sugar -I used brown
     1/2 C White Sugar
     1/2 tsp Cinnamon
     1/4 tsp Nutmeg
     1 pinch Salt
     1/2 C Butter, not melted or softened
    O 1 C Walnuts
  
Mix all of the ingredients except butter in a bowl, then combine butter to the mix until crumbs form.

   O Stir in walnuts

Set mix aside.

Why do you make the topping first? Because the apples will start to turn brown quickly without the lemon on them. If you plan on making this a lot, make a few of the topping mixes and keep them on hand in baggies! You can also do this with the dry ingredients for the filling, just make sure you have a permanent marker to write on the baggies with.

  Apple Chrisp Filling
   Mix together in a bowl
     1/3 C White Sugar
     1 tbs Corn Starch
     1/2 tsp Ginger
     1/2 tsp Cinnamon

   6 Sm-Med Apples, chopped

   2 tbs Lemon Juice

SPRAY the crock if you have non-stick spray!

I prefer Braeburn apples because they are a good small to medium sized apple, not too sweet and not sour, that is great for cooking with AND great for snacking on. They are very versatile.


I've found the best size of apple chunk to my liking is as follows:

Peel your apples, slice each in half, then each of those in half, then horizontally slice & two vertical slices. I know, that is REALLY breaking it down but some people may not have much experience with cutting :) What you'll end up with is each quarter of apple having been chopped into 6 pieces. I don't like 100% mush so this size is perfect for the cooking time.

Place the apples in the crock

    
Mix in dry ingredients from the Apple Chrisp Filling and then sprinkle the lemon juice over it, mixing just a bit.


Over the now mixed apples & lemon, pour the mix from the Apple Chrisp Topping and cover with the lid.


If its a tight fit like mine was, don't worry, it will go down some as it cooks. Do not mix the Topping in and do not open the lid until your chosen cooking time is up. Cook on HIGH 2hrs or LOW 4hrs.

I like mine on LOW for 3 hours. When I did my last batch, I accidentally bumped the knob (see the Honey Wheat Bread incident) to the "off" position about an hour and a half to 2 hours in. Yeaaaaaahhhhh.... don't do that. I was able to turn it up in time to have it ready after dinner, but don't do that! I forgot to build a fortress around it with cups and spoons :(

The good news? The night I last made this apple chrisp, I may have recruited another crocker. Oh yes. I'm working on it but I may have made yet another believer!

Sunday, December 4, 2011

Can I Bob's Red Mill in a Crock Pot?

I bought a few packages of Bob's Red Mill products that said "gluten free" for my best friend for her birthday. She has fibromyalgia AND a few allergies, one of them being legumes. I didn't remember the legumes until after I bought them and 3 of them (all purpose baking flour, bread mix, biscuit mix) were made with garbanzo bean flour. ARGH! So I gave her the brownie mix and corn bread mix (laaaaamest present ever!). I thought about making the brownies and bringing them to her but that would make me feel like, "you may not want to eat a brownie right now but you have to because I made them and here they are, already made, so eat. Now." I know that's probably not how it would have gone down but I think if you make something, the person is pretty much obligated to try it right then and there and maybe she didn't feel like a brownie. I do not want to be a brownie pusher. "Hey man... Psssst... hey.. I'll sell you a dime-bag of brownies for a dollar, man!" You know, like that.

I hadn't crocked anything in a few days and was feeling the itch when I got home last night (I can quit any time, I tell ya!) And here were these three little bags of Bob's Red Mill just a-staring at me with their soulful little cellophanes practically BEGGING me to make one. I chose the bread and figured, well, I'm not going to lose anything if it doesn't work out.

Did you read my Honey Wheat Bread post? If you did or when you do, you'll know that I realize I need a stand mixer. Baaaaad. I wasn't going to make another dough until I got one because a hand mixer just isn't good for dough. I KNOW this. I was aware of this going into the Bob's Red Mill Bread Mix.

*sigh*

And I did it anyway.

I rinsed my crock under hot water because I don't want a cold crock near anything that's going to have yeast in it. I then greased it very well and remembering how hard it was to get the Honey Wheat Bread out, this time after I greased (with Crisco as always) I floured it. I threw a handful of all purpose flour in it, rolled it around and coated the inside. Then I opened my kitchen window and dumped it out (the flour, not the crock, although I have lost quite a few things through the window this way and my loving husband usually retrieves it for me. Anything to keep the good food coming his way!) into my garden. I love having my garden right outside the kitchen and I love the cycle of food into compost into garden into food! Our animals know that special spot and between the dogs, cats, rabbits and chickens, whatever we dump gets used and the rest spread into the garden. Do you have random lumps, hills, or mountains of soil, compost, animal bedding or rabbit poo? Get yourself some chickens! They do a wonderful job of spreading piles out completely flat! Chickens is where its at!

I took the little packet of yeast out of the mix, microwaved my bowl for 10 seconds to warm it up, poured in the milk, added yeast and covered it with a paper towel. I let that sit to foam for 5 minutes and went to put together the rest of the ingredients.

Not everything goes smoothly, I don't know everything, sometimes I can be a bit ditzy... I read, "1 whole egg plus enough egg whites to make 3/4 of a cup." Okaaaaaay... did that mean I put the whole egg in the measuring cup AND THEN add egg whites into the cup until it hit the 3/4 mark? Or did I add 1 whole egg to the bowl and then fill a measuring cup to the 3/4 mark with egg whites? I still don't know the answer to that.

My chickens have had a cold (one of them was sneezing & wheezing) and are currently on antibiotics so I'm running a bit low on eggs at the moment and I decided to see how far the whites of my remaining eggs would get me before I decided where to put the whole egg. I started separating eggs into the measuring cup (yolk out the window) and it barely registered so I panicked and the last 4 eggs I had went in whole and I ended up dumping 3/4 C total of eggs into the mix, not 1 whole egg plus 3/4. I added the mix and the  apple cider vinegar it called for and got out my trusty hand mixer. There was dried Honey Wheat Bread dough stuck up inside and I knocked as much loose as I could. I girded my loins and prepared to flick the switch, not knowing if it would work (quite a lot of dough had gotten in there) or if it would smoke or maybe shoot flames... and I turned it on (picture me holding it an arms length away).

Quite disappointing that nothing spectacular happened other than  the whir of the beaters rotating. I dipped it into the dough oh-so-gingerly, spatula in my left hand to beat back any encroaching dough, and started mixing. A little less than a minute of the 3 required minutes in, my mixer started bogging down. I started furiously scraping it away from the mixer itself (it kept rising on the beaters) and it got away from me and into the housing. Again. And all over a good portion of my kitchen because I freaked and pulled it out of the bowl.

Sh*#%$!!

I mixed it as well as I could with the spatula and plopped it into the crock pot. It had a lot of peaks and wasn't settling down and (let me repeat) I know nothing about dough so I figured OH WELL. Its going to do what it'll do. I set the warmer on high, timer for 3 hours.

It rose so much that I had to put a heavy pan on top of the crock's lid to keep it down! It looked like brains, though, and not a smooth fluffy bread. It looked sort of like a giant dumpling.

I let it cook for about 2 1/2 hours, took the crock out of the warmer and let that sit for another 1/2 hour. Thanks to my genius idea of flouring the crock, it came out easily and onto a plate. I let it cool for another 10 minutes and carefully sliced it with a bread knife (it is important to use a bread knife on bread -it won't smash it) and buttered a slice. It was... okay. I think it will make okay toast but I haven't tried it yet. I know it would have turned out better had I been able to mix it properly but instead I ended up with a hideous chud of a loaf of bread.

Can I Bob's Red Mill in a crock pot?

I'm going to say... no. Not really. Not yet.

UPDATE 12/05/11:    No! It was most definitely NOT good as toast. My husband really loved it with the Incredibly Edible Elk Stew (recipe to come at some point) and tried getting me to taste it that way. Luckily for him, he was able to duck my flying fork. *shudder*


Saturday, December 3, 2011

Garlic Conversions (bookmark this)


Garlic is my favorite spice and one of my favorite flowers because it reminds me so much of books written by Dr. Seuss. If I'm cooking, it's probably got garlic in it and my new favorite (previously secret) weapon is the Spice Hunter's California Blend Garlic Salt. It is GORGEOUS to look at, AMAZING to smell and INSANELY BEAUTIFUL tasting. It is MINE and Shawn is not allowed to use it. Ever. I picked it up for a reasonable price at my local Fop Toods. Getcha some!


Occasionally (okay, a lot) I run into recipes that call for a version of garlic that I do not yet have. There are:


Garlic Flakes.
Chopped Garlic.
Garlic Cloves.
Minced Garlic.
Garlic Powder.
Granulated Garlic.
Garlic Juice.

What happens if you don't have what the recipe calls for, but you've got some other version? How much is exactly the same? You've got to call someone or scour any recipe books you can find around the house or go online to google the conversion. For me it's picking up the phone and, "Mooooooooom!!!"

Not anymore, my friend!

Here's a little something I picked up from the Kitchen Dictionary :

  Garlic Conversions

    1 clove =
    1 tsp chopped garlic =
    1/2 tsp minced garlic =
    1/2 tsp garlic flakes =
    1/2 tsp garlic juice = 
    1/4 tsp granulated garlic =
    1/8 tsp garlic powder

YES!!!! I high-fived MYSELF when I found that nugget of info! If you're crazy like me, you'll print that out and laminate it and have it posted on your fridge. If you haven't thought about laminating your recipe cards, now is a good time. Laminating machines are not expensive at all. I picked mine up for less than $20 at my local Mal-Wart! Laminate it, but halt at the golden gilding, okay? It's great but geesh.

Here are some more tips from the Kitchen Dictionary about garlic that you may find interesting:

It is known as the stinking rose. The edible bulb is made up of sections called cloves, that are encased in a parchmentlike membrane. Three major varieties are available in the US: the white-skinned strongly flavored American garlic; Mexican and Italian garlic, which have mauve-colored skins and a somewhat milder flavor; and the white-skinned, mild flavored elephant garlic, which is not a true garlic, but a relative of the leek. Green garlic, is young garlic before it begins to form cloves; resembling a baby leek, with a long green top and white bulb. Garlic's essential oils remain in the body long after consumption, affecting breath and even skin odor.


How to select: Choose firm, plump bulbs with dry skins. Avoid soft or shriveled cloves and garlic stored in the refrigerated section of the produce department.

How to store: Store fresh garlic in an open container in a cool, dark place. Unbroken bulbs can be stored up to 8 weeks. Once broken from the bulb, individual cloves will keep 3-10 days.

You're welcome!! Please share your comments, suggestions, and current scarf trends (I worship scarves!).

Pork Chops ala Crock

I like pork, I have nothing against it, its just never been one of my favorite meats. It might be be cause I do not like a lot of fat. Well, I don't like ANY fat really and pork seems to be 50% (in reality probably less than 25%). We raised pigs this year though (first time) so in preparation I scoured the internet for recipes and found this little ditty.
I am aware that a ditty is a song or song-like tune. This recipe makes my tastebuds siiiiiiing! Hence, it is a ditty.
I'm going to make this shorter than my usual posts because I've got to clean my kitchen! Just threw a bread dough in the crock (link will be here soon) and made a hellacious mess because I do not have a stand mixer as of yet! Argh!


  Pork Chops ala Crock
   Grease your crock pot!
     4 bone-in pork chops -the ones from our pigs were 1.5lbs each!


    Place the chops in the bottom of the crock. You may have to layer them.


    In a separate bowl, mix together:
     1 can cream of chicken soup
     1 packet of dry onion *shudder* soup
     1 packet of dry pork gravy -this was hard for me to find dry!
     1 1/2 C chicken broth


I mixed all of that together and then strained it over the chops so that the repulsive onion *shudder* bits didn't get through to taint my meat! You don't need to do this though. I am the crazy picky eater, not you. Or are you?
After you pour the mix over the chops, crock on LOW 6 to 8 hrs.
Pull the chops out and make a gravy with the remaining liquids. I swear, if you try this recipe this way, you'd kiss me if you could!
Please leave any comments, feedback, questions, cleaned up dirty jokes...
**UPDATE** 12/06/11: We had these tonight for dinner, it was my 2nd time making them. My husband hadn't remembered how amazing they were until he took a bite and said such things as:
     "Wow. I never want this taste to leave my mouth."
     "That is CRAZY good!"
     "They should make gum in this flavor so I can eat it longer."
     "You know what the problem with making that is? What can you do to top it?!"
I should rename these "Bribery Chops" because I believe I could have asked for and gotten anything I wanted with a plate of these in front of him :)
One thing I will change next time, I will double all ingredients except the chops. The gravy was so spectacular that a full small sauce pot of it wasn't enough for us! Maybe I'll actually be able to get some in the freezer this time!

I apologize for not having an "After" photo. 
Every time I make these, my family eats them before I can snap a picture!

Lasagna Can Be Crock Potted!!

Oh yes it can!!

Would you like to know the bestest most best ever part in the whole wide world???

The noodles...

don't need...

to be cooked!!!

I know!! You're freaking out! "What?? Let me read that again. She's GOT to be joking! How can you make a lasagna without cooking the noodles first?!"

Well, ladies and gentlemens, like THIS:


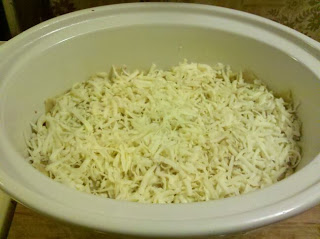
It is pictured in Hamilton, my beloved 7qt crock. I used Hamilton because I didn't know how much space the recipe would take up and my other crock is a only a 4qt (Hamilton, Jr.). Once I discovered this, even though I knew it wouldn't cook as well due to so much empty space (remember, you want to fill 3/4 to get the most out of it).

It tasted absolutely delicious, we all loved it, and I learned a few things from this, my first attempt. I will give you the recipe first and then I'll gab some more about my version, tips, etc.

  Lasagna Ala Crock Pot
  
     1 pkg burger (I used buffalo)
     1 onion *shudder*, chopped -I replaced with a small bit of onion powder. That's progress.
     2 garlic cloves, smashed or 1 tsp minced garlic -I used minced
   

   Brown ground meat, onion & garlic. While this is browning, grease your crock. CROCK! Geez.
        
     1 (28oz) can tomato sauce
     1 (6oz) can tomato paste
     1 1/2 tsp salt
     1 tsp dried oregano


Add tomato sauce, tomato paste, salt & oregano and cook it just long enough to warm it all.

     12oz cottage cheese -I used ricotta
     16oz mozzarella cheese, shredded
     1/2 C grated parmesan cheese or asiago cheese


     12oz Lasagna noodles uncooked -I used an entire 16oz box

Spoon layer of meat sauce onto bottom of crock.
Add double layer of noodles (try to keep noodles from touching sides as much as you can. It is inevitable that some will, but try anyway) & top with cheeses. Do not mix cheeses together in a bowl first. Trust me.
Repeat with sauce, noodles, cheese until all are used up. (I topped with shredded mozzarella).
Cover and cook on LOW for 4-5 hours, I have to leave my house at 8am and don't return home until 3pm so I set my timer for 1:30 so we could eat around 5:30-6. 


This lasagna was good and that's why I'm giving you that version, that option, to try for yourself.

NOW, there will be a few changes to the next lasagna I make! While it tasted great, the sauce was NOT enough to my liking, I have to have sauce under AND over my noodles or else the cheese & noodle layers become one thick conglomerated amalgam of an entity. The next lasagna I do, I will take an extra can of tomato sauce and an extra can of tomato paste, mix them together (pastesauce) in a bowl and layer things suchly:


     Layer of meat sauce
     Double layer of noodles

     Layer of pastesauce
     Layer of cheeses

and repeat!


If you have any questions, comments, versions of your own, or a darn good knock knock joke, please use the comment box below!

Thursday, December 1, 2011

Non-Crock Pot Meatloaf!

*GASP*!
I know what you're thinking, "whatwhatWHAAAAT?! Meatloaf NOT in a crock pot?! Blasphemy! You are not a true potter of the crock!"
Yes, I know.. I know... I KNOW how it looks but just hang in there with me. Stay with me, for I will take you on a journey of AMAZINGLY easy and tasty culinary delights! I will do a crock pot meatloaf soon and then you will have this to compare it to! The bright side is always beautiful, isn't it? Allow me to provide you a double rainbow in the form of my Non-Crock Pot Meatloaf RECIPE..PE..PE..!! Holy cats, what an echo!
Wait, before I give you the recipe (ha ha made you wait) let me first clear the air (Darnit, Brenda! Lay off the legumes!) and tell you how I feel regarding using some pre-mixed ingredients. I'm fine with it. While some people may feel it is "cheating" (isn't the result the same??) or not true cooking (really?) I put my crock pot in one plug in at a time just like them. In my life, super ultra mega busy as it is, I need easy and quick. Packaged pre-mixed ingredients allow me to spend more time with my family, animals and job without shirking anything at the expense of trying to make a nice meal. Also, they are more affordable short-term. If I'm wanting to try a new recipe but maybe don't have enough cash to get all of the individual ingredients (or maybe don't want to spend the time deciphering them), spending $1 on a packet is clearly the better choice in my view *hurrumph*!
So don't you be ashamed if you throw taco seasoning in your chili or a gravy packet on your roast! Packet away and know that you've got extra time to play charades or, "What's That Clickin' Noise?" and play with PRIDE!
I should also make clear that we grow and raise and hunt as much of our own food as possible. I do not have to eat organic but if I have the option I will take it. The meat we have is always our own and always packaged in white freezer paper. This will be reflected in the types and portions of ingredients as you will see so I will give you conversions:
     Elk = Chemically Enhanced Beef
     Deer = Hormone-Ridden Beef
     Bear = Beef With Unnatural Chemical Additives
     Buffalo = Beef That May Have Been Raised/Slaughtered Cruelly
     Package = 1 lb
I'm kidding (no I'm not). I will eat hotdogs and that is nothing BUT chemically enhanced and hormone filled mysterious meat product and I enjoy it. I, however, do not choose to eat it regularly and avoid anything that strictly says "Beef". Except hotdogs. I know they're lying. I will eat beef hotdogs.
Onward to the recipe!
   Non-Crock Pot Meatloaf
     Heat oven to 375
     Grease or use non-stick spray on your loaf pan
     Add the following to a bowl:
     1 pkg Pork Sausage
     1 pkg Elk or Deer or Buffalo burger
     1 slightly rounded tbsp (or 1/3 of) McCormick Meatloaf Seasoning packet
     2 eggs, lightly mix them with a fork    
     1/2 C milk
     8 crackers, crumble them well as you put them in


   Mix it together with your hand(s). This is the absolute best way to make sure that not only are the crackers crumbled enough but that the sausage and burger are well blended also. Roll up the remaining packet of McCormick's for the next meatloaf.

   Plop the mixture into your greased loaf pan and pat it around evenly with your hand


   Placed uncovered in middle rack of oven and bake for 1 hour.
Sometimes I run out of pork sausage and I will substitute it for the venison sausage we make ourselves. When that happens I use a full packet of McCormick's because the venison sausage is much, much milder than the pork sausage.
When the loaf is done, let it rest on the counter for 10 minutes before slicing. This little trick is something you will want to do with ANY meat you're baking. BUT if there are any juices, immediately pour them into a small sauce pot and THEN let the meat rest. I like to take a slice of the loaf and crumble it as tiny as possible into the juices in the pot and make a gravy, adding water and cornstarch (flour dulls the flavor and you will need to add spices if you use it instead of cornstarch) as necessary to create as much gravy as you need with the thickness you prefer. I usually pour it over my homemade organically homegrown mashed potatoes (we grow a ton of Yellow Finn's in our garden). MMmMmmmmmMMM!
Due to a PTO (Parent Teacher Organization at the local school, of which I am the Vice President) meeting after work today, I did not have time to make mashed potatoes. Instead, thinking of the intensely flavored loaf, I am choosing to have sides thusly:
    
     Knorr Pasta Sides "Alfredo". A nice mild backdrop to the SuperFlavor of the meatloaf.... and it only takes 10 minutes in the microwave. Also some green beans with butter seasoned with California Blend Garlic Salt.
Hey! Microwaving IS cooking and I'll tell you a little something, its much more energy efficient! I guess you could just say I really love the environment *sniff*.
Please leave comments, questions, jokes....
**I will post photos tomorrow**

Honey Wheat Bread


Next we have an excellent Honey Wheat Bread. I will keep this short and sweet, only telling you that I totally ruined my own because SOMEHOW the temp knob got turned to warm and it ended up almost burnt on the outside, too gooey in the middle, and perfect in between. I used a 100% organic fine-milled whole wheat flour that was grown, milled, and packaged by a farm in Montana. It sounds exotic that way. I'm really trying to distract you from asking the name because I CANNOT REMEMBER IT and I want to tell you the name of the brand because I like it very much. The flavor and texture of the "done right" part of the bread was extremely good and I do intend to make it again... right, this time!


  Honey Wheat Bread
     
     2/3 C powdered milk
     2 C warm water

  Dissolve the milk in the warm water, then add:

     1/4 C honey
    .25oz (packet) or 2 1/4  tsp active dry yeast

  Grease your crock! Now add:
   
     3/4 tsp salt
     2tbs vegetable oil
     1 1/2 C whole wheat flour
     1/2 C flour

  Mix on LOW for 2 minutes then add:

     1 1/2 C whole wheat flour
     1/2 C flour

At this point it was really getting thick, bogging down my hand mixer so I figured, "Hey, let's kick this speed up a notch!" Wrong choice. SO wrong. I now have dough all up in my mixer's grill and I can't get it out. On the positive side, it's a great excuse to buy a new mixer!! It will have to be another hand mixer because I can't quite afford a KitchenAid mixer. Someday we will be together, KitchenAid Mixer. On this day, I vow that I will wait for you!

*ahem*

Cook on high for 2 to 3 hours. Do not do what I did. Make sure you have it on HIGH and that it does not get bumped. Maybe make a little fortress around it using coffee cups and forks? Please post pictures of your attempts at fort making and as always, please post any comments, feedback, questions and ENJOY!

Bread in a Crock Pot. Seriously!


White Bread

I know, I know... it's not the best picture ever but it was scared to leave the house for a photo shoot. I snuck up on it and took this photo before I had the blog going. Next time I promise I'll hire some hunky model to hold it and I'll drape him in nothing but an apron. You want blonde or brunette? -You're welcome-

Before we get to the recipe (I'm going to make you wait for it. You have to read this boring part first. Yes, I'm aware that you can just scroll down but I'm counting on your kind nature and willpower to refrain.) I'm going to make sure you understand a few things first. Maybe you have no one to give you tips but me (I'm honored) or maybe you're a pro, but I'm going to share the little bit I learned thus far (it's not much but it's all I have and yes, I talk like this in real life. With parenthesis and everything. You should see my "air quote", it's quite something.) and I'm going to share it in a very slow, easy to understand manner. Some of you may be new crockers :)

Always grease your crock. CROCK, you dirty minded little bugger! I use unflavored Crisco and I buy the sticks in bulk. Grab a paper towel, wrap it around a few of your fingers, swipe it through the end of the Crisco bar until you have a nice chunk on there and swab the inside of your crock with it. Don't forget to go up around the top too and make sure you've got the L of the bottom meeting the sidewall very well. Using a paper towel will keep most of the grease off of your hand and what soaks through is a great hand moisturizer! Win-win!

The bowl you use to place the yeast in when you're activating it... make it a glass or ceramic one and microwave it for about 10 seconds before you put anything in it. Warmth is your friend when it comes to yeast!

I'm not sure if I have to say this or not, so I will. Never have the warmer ON before you have a crock full of stuff in it! There is never a need to pre-warm the warmer or pre-warm an empty crock. Crocks work best when 3/4 full anyway.

Still here? Wow, you made it pretty far! To the recipemobile!!

  White Bread

      .25oz(packet) or 2 1/4 tsp active dry yeast
      1 tsp sugar
      1/4 C warm water

      Combine those in a bowl. Allow yeast to foam, about 5 minutes (this is when I usually grease the crock). 


  Add:

      1 egg
      1/4 C vegetable oil
      1 C lukewarm water
      1 tsp salt
      1/4 C sugar
      2 C flour

   Beat with electric mixer for 2 minutes. With a wooden spoon, stir in:

      1 1/2 to 2 C flour

Place dough in greased 4 to 5 quart crock pot. Cover and cook on high for 2 to 3 hours. Remove stoneware from cooker & let stand 5 minutes before slicing. 


I really enjoyed this recipe. As it is, it created a wonderful bread great for buttering to accompany your dinner or toasted and spread with my homemade raspberry jam (made with raspberries from my very own garden. I will share that recipe next year when my raspberry bushes ripen again!) but since I can't give you MY jam, it will probably taste almost as good with yours!

Please make sure to post feedback, questions, or ideas of your own!